Day Three
To be honest I’ve lost track of the days, but think of them as phases and a gauge of how long things took.
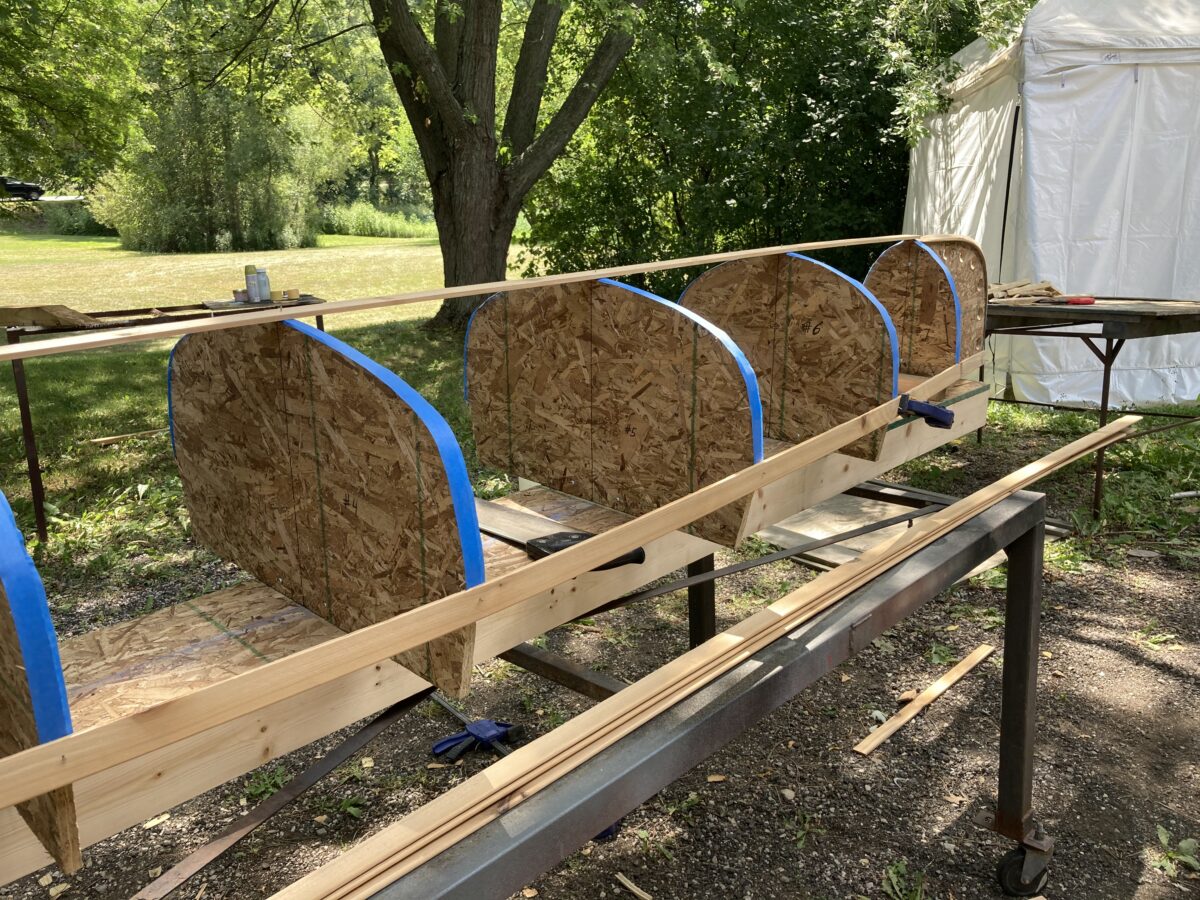
The inner stems dried and cured overnight, then I installed them (form and all) onto the strongback. I used a saber saw and an angle grinder to shape the stems into kind of a triangular profile. The goal is that the stems will act as the anchor point for the ends of the strips, coming next.


With the stems shaped, I was finally ready to start stripping. I got the first strip on each side before the end of the day. I also have a temporary strip straight along the keel line to help me ensure that the forms stay square.
The forms have notches marking the top edge of the canoe (the bottom here, since it’s upside down. I installed the first strip about 1/4″ below this line to give myself some wiggle room. After the rails are on I can plane this top strip flush with the rail.

Day Four
The first few strips went on relatively easily, but none of them simply fell into place. I don’t want to glue the strips to the forms, because the whole shell needs to pop off the forms after I get all the strips on. So the first strip doesn’t have any glue except at the stems. In between, I needed to hold it in place somehow. Mac suggested using small nails, with the heads sticking out so I can easily pull them later. That worked for the most part, but I added clamps in a couple spots where the the nails wanted to pull out.
The next few strips each got glued to the previous, and they were not hard to position. The bead and cove joins were very nice to keep the glue even and to make it obvious when the joints were lined up. I thought I’d develop a rhythm and be able to add strips one after the other, but rhythm was definitely not the right word. Each strip seemed to bring some new and unique challenges.


As you can see, I tried a number of different methods to hold the strips in place. I did not expect the strips to require so much support in between the form pieces, even though I was warned by multiple builders. The challenge on these first strips was to keep them tight against the forms while simultaneously applying pressure down to hold each strip against the previous. I was impatient so I didn’t want to wait for the glue on one strip to set before adding the next, but I was limited by the number of clamps I had.
For the first few strips, I used staples to hold the strips in place at the forms. A scrap of bead and cove was a great way to hold a strip in place without putting holes in it. The elastic cord helped pull the joints tight while spring clamps or these fancy larger clamps with plastic feet helped keep the strips aligned with each other.
Whether clamping or tying strips together, I tried to keep from damaging the exposed cove edge by putting a scrap piece in between. In hindsight, a bit of 1/4″ dowel would have been a great way to do this. One builder suggested installing the bead edge on this side, specifically to clamp against without damaging it, but I liked having the cove up to hold a nice bead of glue without it running all over the place.
A note on design choices
This is my first canoe so I didn’t try to do anything super fancy. But I thought about it. There are a few options on how to lay the strips. What I did was simply start at the rail and work my way toward the keel. Some builders prefer to start at or near the water line, then work in both directions. You might prefer one look over another, depending on the overall shape of your hull, how much rocker your boat will have (that is how much higher the rail is at the bow and stern than in the middle), and what you want your feature strip to look like (if any).
I did not try to do a fancy feature strip, but I thought about it. I figured the third strip would be particularly visible, so I selected strips with the most interesting grain pattern to go in this location.
Days Five and Six


There was no routine to find when installing strips. Each one was being bent and curved in a slightly different way, so it required different techniques to hold it in place. Once I started to round the curve toward the bottom, things got tricky enough that I almost had to do one strip at a time simply because I needed so much equipment to hold the one strip in place that I couldn’t get the next strip in there at all.

Also, at about this point, I revisited the shape of the inner stems to make sure that the strips were making good contact against the angled face of the stems.
Things slowed down a bit here as I spent a lot of time waiting around for glue to dry. It gave me some time to think about what I might do differently next time.
Notes for future builds
I prepared myself for stripping by watching a bunch of videos and reading what I could find. even so there were a few things that I learned through the process.
- One design decision I made early on may or may not have been a good one. Most builders use cedar strips about 5/8″ to 3/4″ wide. I went a little wider. My strips are just over an inch wide. This saved a ton of time preparing the strips: ripping, planing, and routing. But when it came to putting them on the forms, I had to fight a lot to get them into position. (See the section on fails, below.). In the end, I think it might have been a tossup whether or not I saved any time. The wider strips do create a unique appearance, though, which you may or may not appreciate.
- I had plenty of clamps on hand, which were important. I eventually found that ratchet straps were a great thing too. Next time I’d try using those earlier to see if they could be useful. However, they were especially important once I started getting some roundness to the hull.

- Maybe because of my wider strips, I found myself fighting even when using staples to hold the strips in place. The staples kept pulling out. So… longer staples? Using a scrap above the strip, I could have screwed it into the form. I didn’t try that, but it could have held better. Really, though, I desired a specialized tool. I discovered that vice grips were almost perfect for this. I could clamp the vice grips onto the form in such a way as to get some leverage and push the strip against the previous. Now, if only my vice grips had some sort of plate to simultaneously hold the strip down against the form, it would be perfect. If I were to do multiple canoes, I would definitely get a dozen or so vice grips with plates welded on the sides.


Day Seven
When I got all the more-or-less full length strips on the canoe, I paused. This was a good place to switch strip patterns. I had originally imagined following the same pattern all the way to the keel line, but once I found how much wrestling I had to do to get my wide strips in place I decided to save myself the hassle and lay the bottom strips straight along the length of the boat.
This was also a good time to figure out how to install the outer stems.

The outer stem was a little tricky for two reasons. One, I intended to form it on the boat. Second, while it starts at the bow and stern on the butt end of the strips, it ends up at the keel line embedded in between the strips.


Some builders form the outer stem at the same time as they form the inner stem. I didn’t, and I think the whole project was easier this way. First, this would mean I’d have to do it before I started stripping. That would have required a lot more planning, it would have required having cherry (not just cedar) on hand at the start, and it would have meant I couldn’t start stripping for another couple days. Additionally, forming the outer stem on the body of the canoe made it much easier to see that everything would fit right.
Mac’s plans suggested that I could form the outer stem later, so that’s what I did. Mac also suggests the possibility of not using an outer stem at all, and instead simply cutting the cedar strips to come to a point at the bow and stern, then rounding them into a nice shape. I considered this for a few minutes, but I didn’t like the idea.
First, it was much easier to run the strips long and not have to worry about a finished joint at the same time as I was worrying about bending and gluing the strips to each other. Second, I like the idea of a hardwood stem that arguably will provide some more strength. While I don’t intend to ram anything with my little canoe, if I do bump something in the water you know it will be against this surface. So I might as well make it strong.
After cutting and sanding the ends of the strips fair at the bow and stern, I got out a chisel and cut a channel in between the strips as they approach the keel line. I installed the cherry plies of the outer stems one piece at a time to make sure I was getting a good fit. When they were all in place and smeared with glue, I put as many straps and clamps in place as I could to let them cure overnight.
Finally, I removed the temporary strip along the keel line and put in place a pair of strips to be the final “keel” of the boat. I was careful to get them as straight as possible, and I was pretty pleased with the resulting shape. My boat does not have an actual keel, but the center comes to a subtle yet pointed vee that I hope will provide good tracking in the water.

Leave a Reply